
Before you start
Sign in to the AI Agent Console and select the intended agent under ACTIVE AGENT. Prepare approved contact details and business hours.
Verification scope: Essentials and AI Rules were inspected. Saving changes and the resulting customer-facing behaviour were not tested on the live account.
Step 1
Open Agent Setup and check the selected agent
Choose Agent Setup in the sidebar. Confirm the agent shown beside the page title is the one you intend to configure. Settings for one agent should not be assumed to apply to another.
Open Essentials. The inspected release has Essentials and AI Rules; older instructions referring to separate Operations or Team tabs do not describe this screen.
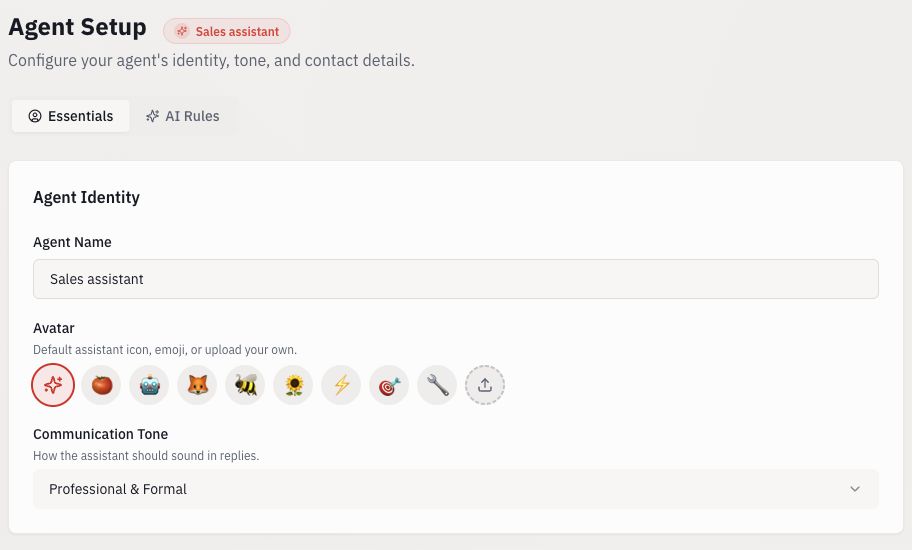
- Open Essentials.
- Enter your customer-facing agent name.
- Choose Communication Tone.
Step 2
Set the customer-facing identity
Under Agent Identity, enter an Agent Name that makes the assistant’s purpose clear. Choose an avatar from the available options or use your approved image, then choose Communication Tone.
Use an honest name such as Product Enquiry Assistant. Avoid suggesting that the agent is a certified engineer or a named human employee. Keep the tone helpful and practical for questions about specifications, applications and quotation requirements.
Step 3
Add useful contact and welcome information
In Contact information, review each Title, Description and Value. Use Add contact when another approved customer-facing contact is needed. Check every email address and telephone number before saving; do not publish personal staff details without approval.
In the chat welcome configuration, write an Agent description explaining its scope. Use Quick start options for common tasks such as finding a product or asking about rental requirements. Conversation placeholders should help customers start a useful enquiry rather than promise a confirmed price or availability.
Step 4
Set working hours and handover wording
In Essentials, find Working Hours and select the correct Timezone, Working Days, Start Time and End Time. Use the hours when your team actually handles enquiries, not simply the hours when the website is accessible.
Open AI Rules and review Human Handover Rules. Write a Handover message that explains what happens next without promising an immediate response unless your team can provide it. Test both an in-hours and an out-of-hours scenario before relying on the handover process.
Step 5
Define answer boundaries and reply detail
In AI Rules, complete Knowledge domain limitation and Topics the AI should not answer directly. Describe the products and business questions it may cover, then identify matters needing a person: negotiated prices, unconfirmed stock, safety-critical suitability or contract exceptions.
Choose Short, Standard or Detailed under Language & Reply Style. Detailed can support product comparisons, but length alone does not make an answer accurate. Use approved sources and test the result.
Example — adapt and approve before use
Answer using our approved product and policy information. If price, availability or technical suitability is not confirmed, explain what needs checking and request a team review. Do not invent a specification or delivery promise.
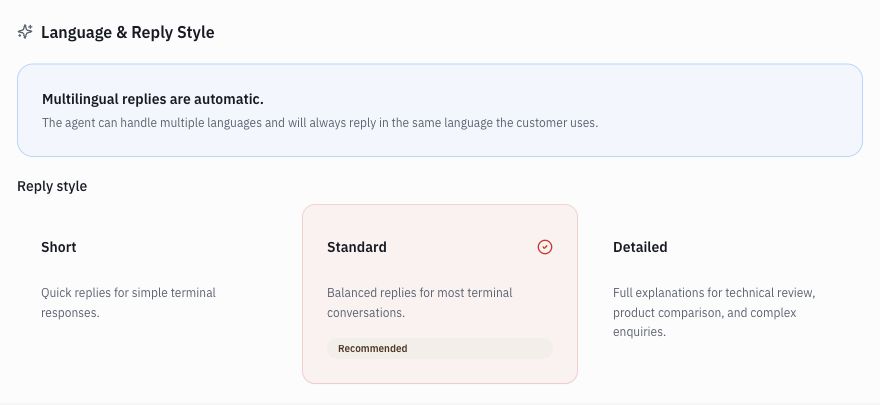
- Choose the level of detail, then test real enquiries.
Step 6
Save and check the customer experience
Review the edited fields and choose Save Changes when available. Wait for the interface to confirm that changes are saved. If you see an error, resolve it before moving on.
Open Playground and ask about the agent’s purpose, contact details and a topic outside its scope. Check that the response matches your intended boundaries. Do not assume an edit is safe for customers merely because the settings form accepted it.
Completion checklist
- The intended agent has a clear name and approved customer-facing contact details.
- Working hours match the team’s timezone and coverage.
- Test answers follow the intended boundaries and handover wording.
Common questions
Where are Operations and Team tabs?
The inspected live Agent Setup screen has Essentials and AI Rules. Working Hours and Team & Sharing appear within Essentials; do not follow instructions for a different interface version.