
Before you start
Complete Agent Setup, add approved knowledge and have authority to edit the destination website.
Verification scope: Playground controls and installation help were inspected, and its generated customer link was opened successfully to the configured welcome screen. No test message, website installation, handover or new deployment was performed during this review.
Step 1
Prepare a small acceptance test
Choose questions covering your main enquiry types: product specifications, quotation requirements, delivery conditions, rental dates and human handover where relevant. Write the expected answer or source beside each.
Replace the bracketed examples below with your own approved facts before testing. Run each case as a fresh conversation when you want to measure an independent answer. Record the actual response and a pass/fail result. A launch check should assess accuracy and safe boundaries, not just whether the chat responds.
Example — adapt and approve before use
1. Known product
Ask: What is the [capacity/specification] of [model]?
Pass: The value and unit match the approved source.

2. Requirement-based recommendation
Ask: I need [application] with [required capacity] at [location]. What fits?
Pass: Relevant requirements are clarified; any suggested product meets the stated specifications.

3. Product comparison
Ask: Compare [model A] and [model B] for [application].
Pass: Important differences are correct; missing facts are identified, not guessed.

4. No suitable product
Ask for a requirement beyond your listed products.
Pass: The agent does not invent a product or claim an unsuitable match.

5. Unknown commercial fact
Ask for an unconfirmed discount or guaranteed delivery date.
Pass: The agent explains that team confirmation is needed.

6. Customer handover
Ask: I would like to speak to a person about this enquiry.
Pass: The next step is clear and the receiving team can actually find the enquiry.

7. Contact and business hours
Ask how to contact the team and when it is available.
Pass: Approved contacts, timezone and hours are correct.

8. Inventory, only if connected
Ask about a product whose current availability the owner can confirm.
Pass: The answer agrees with the verified source and does not turn stale or missing data into a promise.

Record for each case: date | selected agent | source/version | question | expected result | actual result | pass/fail | correction owner.
Step 2
Test in Playground
Select the intended agent and choose Playground. Ask one test question at a time, compare the answer with your approved source, and record the outcome. Use Reset when you need a fresh conversation context.
If an answer is weak, identify whether the issue is missing knowledge, conflicting source material or unclear AI Rules. Correct the cause and repeat the same test. Testing may use account resources; check Billing rather than assuming test conversations are free.
Step 3
Use the supplied customer chat link
Find Customer chat link and choose Copy link or Open. Use the full generated URL exactly as supplied; the inspected URL includes an agent identifier. Do not remove query parameters or construct the address from a tenant name.
Open the link in a customer-like browser session and check the intended agent, welcome text, example questions and contact details. Only share it publicly after the test answers meet your acceptance criteria.
Step 4
Install the supplied embed on your website
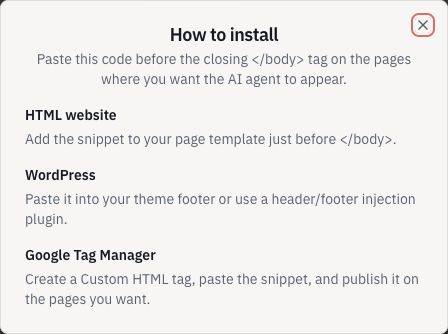
Under Embed on your site, choose Copy snippet. Review Preview and Install help. Give the unchanged snippet to the person responsible for your website and identify the pages on which the agent should appear.
The Console help describes placing the snippet before the closing body tag for HTML websites, using a footer or injection plugin for WordPress, or a Custom HTML tag for Google Tag Manager. Follow your website’s normal review and publishing process.
Step 5
Verify the published page and handover
After an authorised website publish, open the actual page on desktop and mobile. Check that the chat opens, does not obscure important controls and connects to the intended agent. Run a normal enquiry and an escalation test.
Confirm that the receiving team can find and handle the test enquiry. If the widget is missing, check that the snippet was published on that page and consult your website administrator about blocked embeds. Do not paste payment details or secrets into a test chat.
Completion checklist
- Normal, incomplete and out-of-scope questions have been checked.
- The full generated customer link opens the intended agent.
- Any installed widget and team handover have been verified on the destination website.
Common questions
Can I change the chat link to a new .ai address?
Use the link generated by your Console until an approved domain migration is confirmed. Do not replace the current domain by guessing a new address.